- Use UNC path when doing backup and restore
- Create a new web application as well as a site collection before restoring, so that it does not restore on the default web application (C:\Inetpub\wwwroot\wss\VirtualDirectories\80). It will now be something like C:\Inetpub\wwwroot\wss\VirtualDirectories\test.elcom.com.au
- But before restoring, you need to delete the content database of this web application, otherwise it will prompt you with a database exists error.
- When restoring, if it says access denied to the backup folder, you need to give folder write permission to the timer service account.
- Remember local folder permission is not the same as network shared folder permission
- Whenever you have an access denied error, check the followings:
- Database security
- Service account security
- Folder security
- Sharepoint group security
Showing posts with label Sharepoint MOSS 2007. Show all posts
Showing posts with label Sharepoint MOSS 2007. Show all posts
Tuesday, March 24, 2009
Backup & Restore Tips

Sunday, March 22, 2009
FBA: Create and enable FBA Database
Steps:
1. Under the C:\Windows\Microsoft.Net\Framework\v2.0.50727 folder, run aspnet_regsql -S servername -A all -E > press Enter
2. Go to C:\Inetpub\wwwroot\wss\VirtualDirectories\windowsauthenticationappfolder, make a copy of the web.config file and edit the web.config file
3. Go to system.web tag, replace the <system.web> tag with the following:
4. Replace the </configuration> with the following:
1. Under the C:\Windows\Microsoft.Net\Framework\v2.0.50727 folder, run aspnet_regsql -S servername -A all -E > press Enter
2. Go to C:\Inetpub\wwwroot\wss\VirtualDirectories\windowsauthenticationappfolder, make a copy of the web.config file and edit the web.config file
3. Go to system.web tag, replace the <system.web> tag with the following:
<connectionStrings>
<remove name="AspNetSqlProvider" />
<add name="AspNetSqlProvider" connectionString="Data Source=servername;Initial Catalog=aspnetdb;Integrated Security=SSPI;Persist Security Info=False;" />
</connectionStrings>
<system.web>
<membership defaultProvider="AspNetSqlMembershipProvider">
<providers>
<remove name="AspNetSqlMembershipProvider" />
<add connectionStringName="AspNetSqlProvider" passwordAttemptWindow="10" enablePasswordRetrieval="true" enablePasswordReset="true" requiresQuestionAndAnswer="false" applicationName="partners" requiresUniqueEmail="false" passwordFormat="Clear" description="Stores and retrieves membership data from the Microsoft SQL Server database" name="AspNetSqlMembershipProvider" type="System.Web.Security.SqlMembershipProvider, System.Web, Version=2.0.3600.0, Culture=neutral, PublicKeyToken=b03f5f7f11d50a3a" />
</providers>
</membership>
<roleManager enabled="true" defaultProvider="AspNetSqlRoleProvider">
<providers>
<remove name="AspNetSqlRoleProvider" />
<remove name="AspNetWindowsTokenRoleProvider" />
<add applicationName="partners" name="AspNetWindowsTokenRoleProvider" type="System.Web.Security.WindowsTokenRoleProvider, System.Web, Version=2.0.0.0, Culture=neutral, PublicKeyToken=b03f5f7f11d50a3a" />
<add connectionStringName="AspNetSqlProvider" applicationName="partners" description="Stores and retrieves roles data from the local Microsoft SQL Server database" name="AspNetSqlRoleProvider" type="System.Web.Security.SqlRoleProvider, System.Web, Version=2.0.3600.0, Culture=neutral, PublicKeyToken=b03f5f7f11d50a3a" />
</providers>
</roleManager>
4. Replace the </configuration> with the following:
<system.net>
<mailSettings>
<!-- use your mail settingst here -->
<smtp deliveryMethod="Network" from="test@test.com">
<network host="smtp-server" port="25" />
</smtp>
</mailSettings>
</system.net>
</configuration>
5. Go to C:\Inetpub\wwwroot\wss\VirtualDirectories\fbaappfolder, make a copy of the web.config file and edit the web.config file, make the same change as above.
6. Copy the FBA tools to C:\Inetpub\wwwroot\wss\VirtualDirectories\windowsauthenticationappfolder as well as C:\Inetpub\wwwroot\wss\VirtualDirectories\fbaappfolder
7. Run iisreset /noforce
8. Go to your windows authentication site, run the FBA tools and add a user with username and password.
9. Go to People and Groups > Select the e.g. the Visitor Group > New > get the username just added > give permission to the account > click OK, so this user has been added to the windows authentication site successfully.
10. Go to the FBA site, it shoule allow you to see the home page since we enabled the anonymous access previously.
11. Click Sign In > type in the user you have just created in the windows authentication site (default zone) > Click Sign In > Now you are logged in as that user > you can then access the FBA tool to recover your password, it will send the password to you via email.
12. If you encounter an error in the recover page, you can change the customErrors's mode to RemoteOnly in the web.config and run iisreset /noforce to investigate.
13. Go to Central Admin > Application Management > Application Security > Authentication Providers > click on Extranet > uncheck Enable anonymous access > click Save > do the same for the default windows zone.
FBA: Create new zone
Steps:
1. Central Admin > Application Management > Create or Extend Web application > Extend an existing Web application
2. Select the web application that you want to extend > Create a new IIS web site > give it a description > use port 80 > enter Host Header (e.g. test1.elcom.com) > leave the security configuration at default values
3. Choose the Zone (e.g. Extranet) > click OK
4. Central Admin > Application Management > Application Security > Authentication providers
5. Click Extranet > Change the Authentication Type to Forms > Check Enable anonymous access
6. Fill in AspNetSqlMembershipProvider as the Membership provider name.
7. Fill in AspNetSqlRoleProvider as the Role Manager name.
8. Leave the Enable Client Integration as No. FBA does not work well with Office integration. It is because FBA relies on cookies and most users disable persistent cookies in the browser, that is the default security settings. So if you want to enable client integration in FBA, you have to enable persistent cookies on each client, if you do not do that, if you try to open a Word document in a FBA web application, you will get the FBA logon screen in Word. So we will almost always select No here. It is just too hard to get integration working with FBA.
9. Click Save > Go to Operation tab > Alternate Access Mappings, you will see that it creates a mapping for extranet
1. Central Admin > Application Management > Create or Extend Web application > Extend an existing Web application
2. Select the web application that you want to extend > Create a new IIS web site > give it a description > use port 80 > enter Host Header (e.g. test1.elcom.com) > leave the security configuration at default values
3. Choose the Zone (e.g. Extranet) > click OK
4. Central Admin > Application Management > Application Security > Authentication providers
5. Click Extranet > Change the Authentication Type to Forms > Check Enable anonymous access
6. Fill in AspNetSqlMembershipProvider as the Membership provider name.
7. Fill in AspNetSqlRoleProvider as the Role Manager name.
8. Leave the Enable Client Integration as No. FBA does not work well with Office integration. It is because FBA relies on cookies and most users disable persistent cookies in the browser, that is the default security settings. So if you want to enable client integration in FBA, you have to enable persistent cookies on each client, if you do not do that, if you try to open a Word document in a FBA web application, you will get the FBA logon screen in Word. So we will almost always select No here. It is just too hard to get integration working with FBA.
9. Click Save > Go to Operation tab > Alternate Access Mappings, you will see that it creates a mapping for extranet
Wednesday, March 11, 2009
Form Based Authentication
By default, Moss uses windows authentication. But for external users who are not part of your domain, you need to use form based authentication.
Steps:
1. Enable anonymous access on the web application, that allows you to get in and add users using FBA.
2. Create a new zone for the web application by extending the current web application to another IIS web site. Each zone has a different URL that you can use to address the same web application. So you can use one URL for internal users, and a different URL for external users which can be authenticated through FBA.
3. Add a DNS Host A record for the sub-domain
4. Create a database to store membership
5. Edit the web.config
6. Add FBA tools to the web application, Microsoft does not provide the FBA tools.
7. Add FBA users to the web application using the FBA tool.
8. Optionally disable anonymous access. FBA usernames and passwords are entered in clear text, you will need to secure the FBA site with SSL.
Create Zones
Steps:
1. Enable anonymous access on the web application, that allows you to get in and add users using FBA.
2. Create a new zone for the web application by extending the current web application to another IIS web site. Each zone has a different URL that you can use to address the same web application. So you can use one URL for internal users, and a different URL for external users which can be authenticated through FBA.
3. Add a DNS Host A record for the sub-domain
4. Create a database to store membership
5. Edit the web.config
6. Add FBA tools to the web application, Microsoft does not provide the FBA tools.
7. Add FBA users to the web application using the FBA tool.
8. Optionally disable anonymous access. FBA usernames and passwords are entered in clear text, you will need to secure the FBA site with SSL.
Create Zones
- Zones exposes the same content to different audiences
- Allow more than one address:
- http://www.test.com/ (Default)
- http://www.test1.com/ (Extranet)
Adding to DNS
- Create Host A record in DNS to provide internal access
- Create Host A record at ISP to provide external access
Creating the FBA Database
- Use aspnet_regsql utility provided by .NET Framework
- It creates the aspnetdb database by default, you can name it whatever you want
- It registered that database as a membership provider on the server
Enabling Forms Authentication
- In order to use that database, you need to edit web.config for the web application
- Add connection settings are set in:
- connectionStrings tag
- membership tag
- roleManager tag
- You can also add e-mail information for ASP.NET (allows the FBA tools to send out the users password if they forget it)
- system.net tag
- mailSettings tag
- smtp tag
FBA Tools
- Not provided by Microsoft
- You can create them yourself or obtain from third party vendors
Adding FBA Users
- Add the users using the FBA tools
- Set the user's permissions in SharePoint
Turning Off Anonymous Access
- Finally, when you all done setting things up, you need to disable anonymous access in general.
- Anonymous is required first to add first users, it is a chicken and egg issue.
- You then use Central Admin > Application Management to disable anonymous access
Sunday, November 2, 2008
MOSS Video Format
- SharePoint will play all files that windows media player can play. If you have all codecs correctly installed for Media player, then you can host any file in SharePoint and then add a code that will make windows media player play the file.
- But since the user may not have the correct codecs installed for their media player, the best format is wmv since windows media player is made to play .wmv files.
- By Default Moss will allow us to upload File size up to 50 MB. Upload File size can be adjusted to up to 2 GB.
- The best file size will be less than 20MB.
Reference:
Monday, September 8, 2008
Sharepoint Lookup Column - Get multiple values
In this post, I will show you how to display lookup column data in a multiple selection format.
Steps:
1. I have a list called 'ATSCompany' which has a lookup column called 'Video' which references a document library called 'ATSCompany Videos'. Notice that I have selected the 'Allow multiple values' checkbox.

2. Edit a list item of the ATSCompany list, here is what it looks like.

3. After you have selected all 3 videos, the value of the video column is a string containing all the three video file name separated by semicolon.
4. In Sharepoint designer, I have created a custom list form for viewing the ATSCompany List. Right click the List and go to List Properties, you can see that I have specified CompanyProfile.aspx as the view item page for the ATSCompany Page. More details.

5. In the CompanyProfile.aspx, it should displays three links which link to the videos in the 'ATSCompany Videos' document library.

6. In the Sharepoint designer, under the WebPartPages:dataformwebpart of the ATSCompany List. You will have the following to show the video links. Note that template ParseVideoString makes a recursive call to itself.
Steps:
1. I have a list called 'ATSCompany' which has a lookup column called 'Video' which references a document library called 'ATSCompany Videos'. Notice that I have selected the 'Allow multiple values' checkbox.

2. Edit a list item of the ATSCompany list, here is what it looks like.

3. After you have selected all 3 videos, the value of the video column is a string containing all the three video file name separated by semicolon.
4. In Sharepoint designer, I have created a custom list form for viewing the ATSCompany List. Right click the List and go to List Properties, you can see that I have specified CompanyProfile.aspx as the view item page for the ATSCompany Page. More details.

5. In the CompanyProfile.aspx, it should displays three links which link to the videos in the 'ATSCompany Videos' document library.

6. In the Sharepoint designer, under the WebPartPages:dataformwebpart of the ATSCompany List. You will have the following to show the video links. Note that template ParseVideoString makes a recursive call to itself.
1 <xsl:if test=" string-length(@Video) >0" ddwrt:cf_ignore="1">
2 <div>
3 <br />
4 <h3>Videos</h3>
5 <xsl:call-template name="ParseVideoString">
6 <xsl:with-param name="parse-string" select="@Video" />
7 </xsl:call-template>
8 </div>
9 </xsl:if>
1 <xsl:template name="ParseVideoString">
2 <xsl:param name="parse-string"></xsl:param>
3 <xsl:if test="not($parse-string='')">
4 <xsl:choose>
5 <xsl:when test="contains($parse-string, ';')">
6 <a href="../ATSCompany Videos/{substring-before($parse-string, ';')}" ><xsl:value-of select="substring-before($parse-string, ';')"/></a><br /></xsl:when>
7 <xsl:otherwise>
8 <a href="../ATSCompany Videos/{$parse-string}" ><xsl:value-of select="$parse-string"/></a></xsl:otherwise>
9 </xsl:choose>
10 <xsl:call-template name="ParseVideoString">
11 <xsl:with-param name="parse-string">
12 <xsl:value-of select="substring-after($parse-string, ';')"/>
13 </xsl:with-param>
14 </xsl:call-template>
15 </xsl:if>
16 </xsl:template>
Saturday, August 2, 2008
Sharepoint Architecture - IIS 6.0, ASP.NET & ISAPI
IIS 6.0
Apache HTTP Server
Internet Information Services
Internet Server Application Programming Interface
What an ISAPI extension is?
A low-level Look at the ASP.NET Architecture
Inside Microsoft Windows SharePoint Services 3.0
How Do I Determine the Security Account that IIS Uses to Run My Web Site?
Professional ASP.NET 2.0 Server Control and Component Development
- ASP.NET & WSS rely on IIS 6.0 to supply the underlying listening mechanism to process incoming HTTP requests and supply a management infrastructure for launching and running worker processes on the web server.
- IIS can handle request coming in over:
- A specific IP address
- Port number
- Host header
IIS Market Share
- Since April 1996 Apache has been the most popular HTTP server on the World Wide Web. As of June 2008 Apache served 49.12% of all websites.
- Microsoft Internet Information Services is a set of Internet-based services for servers using Microsoft Windows. It is the world's second most popular web server. As of June 2008 it served 35.39% of all websites.
IIS 6.0 installation
- When you install IIS 6.0 on Win Server 2003, the following files and directories are installed:
- C:\windows\System32\InetSrv
- C:\InetPub
- C:\windows\Help\IISHelp
- The following accounts will be created:
- IUSR_computername
- IWAM_computername
Account
- For classic ASP applications:
- The account which anonymous users are running under is IUSR_computername.
- If Application Protection is set to High (Isolated ) and you are using Anonymous Access, the account that IIS is using is the IWAM_computername account.
- For ASP.NET applications:
- ASP.NET will run under ASPNET account. This account will be used by the ASP.NET worker process (aspnet_wp.exe). On Windows Server 2003, ASP.NET will run under "Network Service".
- With ASP.NET Impersonation Disabled, the account which anonymous users are running under is ASPNET or Network Service account.
ISAPI Extensions & Filters
- The Internet Server API (ISAPI) is an N-tier API of Internet Information Services (IIS). ISAPI consists of two components: Extensions and Filters, and they must be written in unmanaged C++.
- When a request comes into Microsoft's IIS Web server its extension is examined and, based on this extension, the request is either handled directly by IIS or routed to an ISAPI extension.
- Simple scenario: IIS simply maps an incoming request to a physical file within the root directory of an IIS web site or virtual directory, such as loading a static html page or an image file.
- Sophisticated routing scenario: IIS also supports ISAPI, so that an incoming request triggers the execution of custom code on the web server.
- ISAPI Extension
- An ISAPI extension is a DLL. IIS can map incoming requests to a set of endpoints that trigger the execution of code within an ISAPI extension DLL.
- Whenever an extension is accessed (e.g., http://www.test.com/myextension.dll?ID=1), IIS checks to see whether the DLL is loaded into memory. If it is not, then IIS will load the DLL which will be loaded to memory once, no matter how many clients are going to use it at the same time.
- Can be configured at level of an IIS web site or virtual directory
- When you install the .NET Framework, an ISAPI extension named aspnet_isapi.dll is automatically registered for handling requests for the .aspx extension. When a user makes a request for a page with the aspx extension, IIS will pick up the request and passes it to the aspnet_isapi.dll ISAPI extension. (Image 1)
- ISAPI Filter
- An ISAPI filter is a DLL the server calls on every HTTP request. It plays the role of an interceptor
- Usage:
- Custom authenticatio
- Request logging
- Can be configured at the level of the IIS web site
 (Image 1)
IIS 5 vs IIS 6
- IIS 5
- When a request comes in, inetinfo.exe process in IIS 5 hosts aspnet_isapi.dll and forwards the request to it. The aspnet_isapi.dll will create a new instance of aspnet_wp.exe worker process. This process will host the .NET runtime and forward the request to it.
- Because the aspnet_isapi.dll and .NET runtime are in two separate processes, they use a named pipe to communicate.
- IIS 6
- IIS 6 doesn’t directly host aspnet_isapi.dll, instead IIS 6 always creates a separate instance of w3wp.exe worker process and all processing occurs inside of this process which hosts both aspnet_isapi.dll and the .NET runtime.This improves the performance because no named pipe is needed.
- IIS uses a device driver named HTTP.SYS to route incoming requests to the proper application pool.

References:
Apache HTTP Server
Internet Information Services
Internet Server Application Programming Interface
What an ISAPI extension is?
A low-level Look at the ASP.NET Architecture
Inside Microsoft Windows SharePoint Services 3.0
How Do I Determine the Security Account that IIS Uses to Run My Web Site?
Professional ASP.NET 2.0 Server Control and Component Development
Thursday, July 31, 2008
Publish Form Template as Content Type
In this post, I will show you how to publish a form template as a site content type. The advantages of publishing form template as content type as opposed to publish directly to form library are:
- Site content types can be used by every library in the site collection
- You can add multiple content types to one library.
Steps:
1. Once you finished designing the form template. Click Publish Form Template from the Design Tasks task pane.
2. Choose to publish the form to a SharePoint server with or without InfoPath Forms Services, and click Next.
3. Enter the location of the SharePoint site.
4. Select Site Content Type and click Next.
5. Select Create a new content type and click Next.
6. Enter a name and description for the new content type.
7. Specify a document library to where you want to save the form template and click Next.
8. You can add, remove, or modify a site column. Click Next.
9. Click Publish and click Close.
10. Open InfoPath, customize a sample of Expense Report, save it as content type as shown above.
11. Go to Site Actions > Site Settings > Modify All Site Settings > Site content types > You can see the two content types you have just created.
12. Click Site Actions > View All Site Content > Create > Form Library > Specify a name for the form library > Create
13. Select Settings > Form Library Settings > Advanced settings > select Yes to allow management of content types > Click OK.
14. Click Add from existing site content types > Select the two content types > click Add.
15. Delete the default 'Form' content type.
16. When you click New, you will notice that there are now two content types you can choose from.
Tuesday, July 29, 2008
Publish Form Template
In this post, I will show you how to publish a form template to a form library.
Steps:
1. Once you finished designing the form template. Click Publish Form Template from the Design Tasks task pane.
2. Choose to publish the form to a SharePoint server with or without InfoPath Forms Services, and click Next.
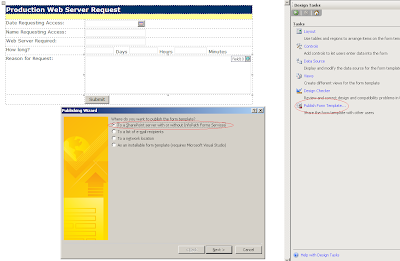
3. Enter the location of the SharePoint site.
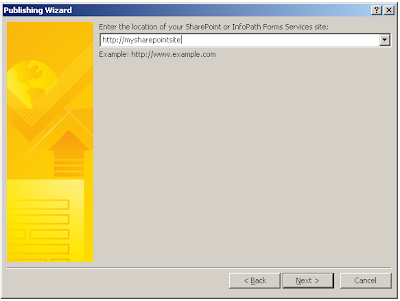
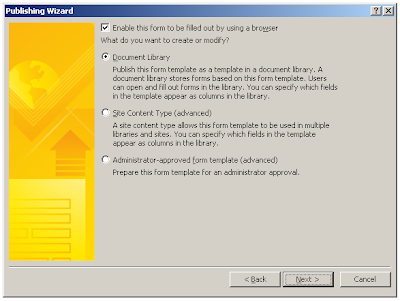
4. We are going to create a document library and click Next.
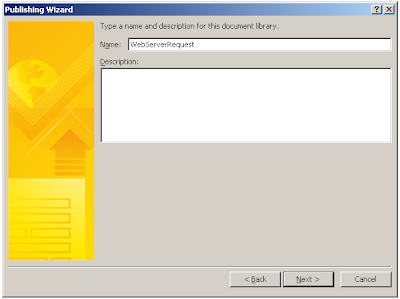
5. Enter a name and description for the new document library.
6. You can determine which form data elements will be visible as columns in the document library.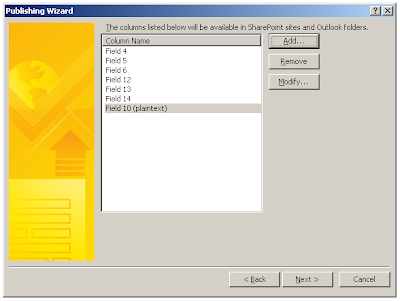
7. Click Publish. Go to the site collection and locate the new library just created. Click New.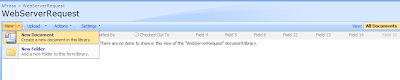
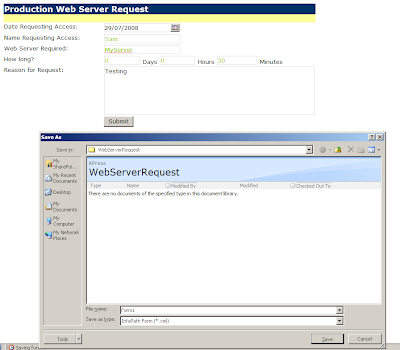
8. Fill out the form and Save the form back to the library.

Steps:
1. Once you finished designing the form template. Click Publish Form Template from the Design Tasks task pane.
2. Choose to publish the form to a SharePoint server with or without InfoPath Forms Services, and click Next.

3. Enter the location of the SharePoint site.

4. We are going to create a document library and click Next.

5. Enter a name and description for the new document library.

6. You can determine which form data elements will be visible as columns in the document library.

7. Click Publish. Go to the site collection and locate the new library just created. Click New.

8. Fill out the form and Save the form back to the library.


Monday, July 28, 2008
InfoPath
Microsoft Office InfoPath 2007
- Collect data in an efficient way.
- Built using XML
- Contains its own set of controls such as
- repeating tables
- repeating sections
- choice groups.
- You can create your own custom controls.
- Controls that are not supported in browser-enabled form templates such as:
- repeating recursive section
- choice group
- horizontal repeating table
- You can publish the form template to the following locations:
- MOSS or WSS 3.0
- Forms Server 2007 server
- Part of an Outlook 2007 email
- Shared network folder
- Installable file (needs Visual Studio 2005 installed)
- Trust Levels
- Security level determines which features are available to the InfoPath form.
- Full trust context, or
- Domain security context, or
- Restricted security level context
- Browser-enabled form cannot be published as a site content type in this context
- Site content type
- Can be used in more than one form library.
- It is possible to use more than one form template per form library
Data Connection Files
- One form template can have
- one main data connection (primary connection) and
- one or more secondary data connections.
- One data connection file can be used by multiple form template
- A data connection can submit to or receive data from an external data source
such as - a web service,
- SharePoint list, or
- SQL Server database.
- A data connection file is an XML file with an .xml or .udc(x) extension, where udc(x) stands Universal Data Connection.
- Udc 1.0 files use the extension .odc, which stands for Office Data Connection. Udc 1.0 files cannot be used by InfoPath 2007.
- Three ways to create data connection files:
- via InfoPath
- Excel
- Create the UDC file manually via Notepad or UDC File Authoring Tool
- Allows you to add authentication information to a data connection file.
Access Sharepoint List
- You can access data that is stored in a SharePoint list within InfoPath form.
- Data stored in a SharePoint list can be accessed via
- SharePoint library
- List data connection
- Allows you to specify authentication information within the data connection itself.
- SharePoint Lists web service
- If use FBA, you cannot use the list directly. You need to use Lists web service.
Program InfoPath
- You can update an InfoPath form programmatically and save it back to a SharePoint form library.
- Steps
- Read the InfoPath form into an XML document
- Update the value in the XML document
- Save the XML document as a InfoPath form to the form library.
Reference:
Sunday, July 20, 2008
Shared Services
Shared Services Provider provides the following services:
- Audiences
- BDC
- Excel Services
- My Sites
- Published Links
- Personalization Links
- Search
- User Profiles
Search
- A SSP can host only a single Search Provider
- Best practice is to implement a single SSP and a single search provider, multiple search providers complicates the SSP design.
User Profiles
- Benefits: search people with skills about a subject
- User profile information can be collected from:
- LDAP: limited content information
- Direct input from user:
- Edit profile in personal feature page if do not have a My Site
- Or My Site User details page
- Properties of users can be used to
- define audiences for targeting content
- Or create custom search scopes
Publishing Links
- It is for relevance.
- Publishing links to Office applications such as Word, Excel or PowerPoint allows you to populate the "Save As" locations based on the who a user is, such as the AD group to which the user belong.
- When you save a word doc, you can specify the sharepoint site folder. If you specify my site to be their default, they will pull information from the SSP every 24 hours.
Personalization Links
- Personalization Links allows you to target content to My Site top link bars.
- You can target information on top link bars to specific users based on the AD group.
- You can also expose Publishing site navigation to your My Sites.
Audiences
- For increasing relevance.
- Audiences allow you to target information to users based on their:
- AD Groups
- Sharepoint Groups
- User Profile information
- You can change the audience settings of your web part to show/hide information based on the user group who are viewing your web part.
- Users cannot easily choose their audience on the fly.
My Sites
- Advantages
- Provide personal workspace for users
- Collecting user information
- Integration with Outlook through Meeting Workspaces
Reference:
Sunday, July 13, 2008
Handling Sharepoint List Events
In May I have blogged about the Search Crawler Custom Workflow. What it basically does is that assume there is a newsletter list which contains a URL field, when a new URL is added to the newsletter list, the workflow will kick start and it will crawls the URL and put it into content source for search later.
In this post, I will talk about how you can handle the newsletter list event to delete the content source when an associated URL is deleted. You can handle the List level event as well as List Item level event. There are Synchronous Events and Asynchronous Events, please take a look at my blog for more list event details.
In this post, I will talk about how you can handle the newsletter list event to delete the content source when an associated URL is deleted. You can handle the List level event as well as List Item level event. There are Synchronous Events and Asynchronous Events, please take a look at my blog for more list event details.
Steps:
1. Create a C# class library and create the ItemEventReceivers which handles the ItemDeleting event for the newsletter list. Note that the "external newsletter" in the code below is the URL field name of the newsletter list.
using System;
using System.Collections.Generic;
using System.Linq;
using System.Text;
using Microsoft.SharePoint;
using Microsoft.Office.Server.Search.Administration;
Namespace ATSListReceiver
{
class ItemEventReceivers : SPItemEventReceiver
{
public override void ItemDeleting(SPItemEventProperties properties)
{
base.ItemDeleting(properties);
//Disable events to prevent an endless loop of event handling!
this.DisableEventFiring();
//******************Step 1: Get the site search context*****************************
//string strURL = @"http://mysiteurl.com.au/";
SearchContext context;
using (SPSite site = new SPSite(strURL))
{
context = SearchContext.GetContext(site);
}
//******************Step 2: Get the Newletter url newsletter list*****************************
String url = properties.ListItem["external newsletter"].ToString();
url = url.Substring(0, url.IndexOf(','));
//******************Step 3: Delete the content source *****************************
Content sspContent = new Content(context);
ContentSourceCollection sspContentSources = sspContent.ContentSources;
if (sspContentSources.Exists(url))
{
ContentSource cs = sspContentSources[url];
cs.Delete();
}
this.EnableEventFiring();
}
}
}
2. Give this project a strong name and deploy this assembly to the GAC.
3. Create a console application to add the handler to the newsletter list.
using System;
using System.Collections.Generic;
using System.Linq;
using System.Text;
using Microsoft.SharePoint;
Namespace ATSAddHandler
{
Class Program
{
static void Main(string[] args)
{
Add_EventHandler_To_Newsletter();
}
public static void Add_EventHandler_To_Newsletter()
{
SPSecurity.RunWithElevatedPrivileges(delegate()
{
string assemblyName = "ATSListReceiver, Version=1.0.0.0, Culture=neutral, PublicKeyToken=dfb38e12474cae53";
string className = "ATSListReceiver.ItemEventReceivers";
SPSite rootSite = new SPSite("http://mysiteurl.gov.au");
SPWeb web = rootSite.AllWebs[""];
web.AllowUnsafeUpdates = true;
SPList newsletter = web.Lists["ATSNewsletter"];
newsletter.EventReceivers.Add(SPEventReceiverType.ItemDeleting, assemblyName, className);
newsletter.Update();
Console.Write("done!");
Console.ReadLine();
});
}
}
}
4. For the purpose of this demo, I used console application, you can also do this in you STSDEV solution and implements this as a List Receiver.
Reference:
Sharepoint 2007: List Events Practical Example: Creating a rigged survey!!
Saturday, July 12, 2008
Using User Control in Sharepoint Web Parts
Web parts are more complicated to implement than user controls. So often people will desire to use user control in web parts. In this case, I will create a user control which contains a repeater to show some information within a custom news list in a MOSS site.
Steps:
1. Create a user control called News.ascx. Make sure you specify this user control to inherit from the solution assembly. By the way, if you do not have a solution set up yet, I recommend you try out STSDEV, this is what I am using in this example.
News.ascx
3. Modify the manifest.xml to include this template file. The modified part is highlighed in red.
Here is the result:
Using user control in web parts
Steps:
1. Create a user control called News.ascx. Make sure you specify this user control to inherit from the solution assembly. By the way, if you do not have a solution set up yet, I recommend you try out STSDEV, this is what I am using in this example.
News.ascx
<%@ Control Language="C#" AutoEventWireup="true" CodeBehind="News.ascx.cs" Inherits="ATSDeploymentSolution.News,ATSDeploymentSolution, Version=1.0.0.0, Culture=neutral, PublicKeyToken=ca6621b7467269f9" %>
<asp:Repeater ID="repNews" runat="server">
<HeaderTemplate>
<div>
</HeaderTemplate>
<ItemTemplate>
<div><%# Eval("ID") %>: <%# Eval("Title") %></div>
</ItemTemplate>
<FooterTemplate>
</div>
</FooterTemplate>
</asp:Repeater>
News.ascx.designer.cs
//------------------------------------------------------------------------------
// <auto-generated>
// This code was generated by a tool.
// Runtime Version:2.0.50727.1433
//
// Changes to this file may cause incorrect behavior and will be lost if
// the code is regenerated.
// </auto-generated>
//------------------------------------------------------------------------------
Namespace ATSDeploymentSolution
{
/// <summary>
/// SimpleList class.
/// </summary>
/// <remarks>
/// Auto-generated class.
/// </remarks>
public partial class News {
protected global::System.Web.UI.WebControls.Repeater repNews;
}
}
News.ascx.cs
using System;
using System.Data;
using System.Configuration;
using System.Collections;
using System.Web;
using System.Web.Security;
using System.Web.UI;
using System.Web.UI.WebControls;
using System.Web.UI.WebControls.WebParts;
using System.Web.UI.HtmlControls;
using Microsoft.SharePoint;
Namespace ATSDeploymentSolution
{
public partial class News : System.Web.UI.UserControl
{
protected void Page_Load(object sender, EventArgs e)
{
if (!IsPostBack)
{
Bind();
}
}
private void Bind()
{
using (SPSite site = new SPSite("http://w2k3sharepoint:43490"))
{
using (SPWeb web = site.OpenWeb())
{
SPList list = web.Lists["ATSNews"];
repNews.DataSource = list.Items.GetDataTable();
repNews.DataBind();
}
}
}
}
}
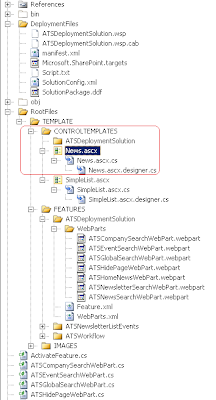
2. Put this user control under the CONTROLTEMPLATES folder which is used to store all the user controls under the 12 hive. You can also notice from this image that I have created a feature called ATSDeploymentSolution which contains a bunch of web parts. ATSHomeNewsWebPart is the web part we will use to load the user control from.

3. Modify the manifest.xml to include this template file. The modified part is highlighed in red.
<?xml version="1.0" encoding="utf-8"?>
<!--Manifest created STSDEV utility at 22/05/2008 11:42:17 AM-->
<Solution SolutionId="4508B2DF-131A-4C52-A806-7C92AFD703A3" ResetWebServer="True" xmlns="http://schemas.microsoft.com/sharepoint/">
<!--Feature Manifest files-->
<FeatureManifests>
<FeatureManifest Location="ATSDeploymentSolution\feature.xml" />
<FeatureManifest Location="ATSWorkflow\feature.xml" />
<FeatureManifest Location="ATSNewsletterListEvents\feature.xml" />
</FeatureManifests>
<!--TEMPLATE files-->
<TemplateFiles>
<TemplateFile Location="IMAGES\ATSDeploymentSolution\AfricanPith32.gif" />
<TemplateFile Location="IMAGES\ATSDeploymentSolution\Thumbs.db" />
<TemplateFile Location="ControlTemplates\SimpleList.ascx" />
<TemplateFile Location="ControlTemplates\News.ascx" />
</TemplateFiles>
<!--Assembly files-->
<Assemblies>
<Assembly Location="ATSDeploymentSolution.dll" DeploymentTarget="GlobalAssemblyCache">
<SafeControls>
<SafeControl Assembly="ATSDeploymentSolution, Version=1.0.0.0, Culture=neutral, PublicKeyToken=ca6621b7467269f9" Namespace="ATSDeploymentSolution" TypeName="*" Safe="True" />
</SafeControls>
</Assembly>
</Assemblies>
</Solution>
4. Specify the path of news.ascx in the SolutionPackage.ddf. The modified part is highlighed in red.
; Generated by STSDEV at 22/05/2008 11:42:17 AM
.OPTION EXPLICIT
.Set CabinetNameTemplate=ATSDeploymentSolution.wsp
.set DiskDirectoryTemplate=CDROM
.Set CompressionType=MSZIP
.Set UniqueFiles=off
.Set Cabinet=on
.Set DiskDirectory1=DeploymentFiles
;*** Solution manifest
DeploymentFiles\manifest.xml
;*** Assembly files
bin/debug/ATSDeploymentSolution.dll
;*** add files for ATSDeploymentSolution feature
.Set DestinationDir=ATSDeploymentSolution
RootFiles\TEMPLATE\FEATURES\ATSDeploymentSolution\Feature.xml
RootFiles\TEMPLATE\FEATURES\ATSDeploymentSolution\WebParts.xml
;*** add files for ATSDeploymentSolution\WebParts feature
.Set DestinationDir=ATSDeploymentSolution\WebParts
RootFiles\TEMPLATE\FEATURES\ATSDeploymentSolution\WebParts\ATSCompanySearchWebPart.webpart
RootFiles\TEMPLATE\FEATURES\ATSDeploymentSolution\WebParts\ATSEventSearchWebPart.webpart
RootFiles\TEMPLATE\FEATURES\ATSDeploymentSolution\WebParts\ATSGlobalSearchWebPart.webpart
RootFiles\TEMPLATE\FEATURES\ATSDeploymentSolution\WebParts\ATSHidePageWebPart.webpart
RootFiles\TEMPLATE\FEATURES\ATSDeploymentSolution\WebParts\ATSNewsletterSearchWebPart.webpart
RootFiles\TEMPLATE\FEATURES\ATSDeploymentSolution\WebParts\ATSNewsSearchWebPart.webpart
RootFiles\TEMPLATE\FEATURES\ATSDeploymentSolution\WebParts\ATSHomeNewsWebPart.webpart
;*** add files for ATSWorkflow feature
.Set DestinationDir=ATSWorkflow
RootFiles\TEMPLATE\FEATURES\ATSWorkflow\Feature.xml
RootFiles\TEMPLATE\FEATURES\ATSWorkflow\Workflow.xml
;*** add files for ATSNewsletterListEvents feature
.Set DestinationDir=ATSNewsletterListEvents
RootFiles\TEMPLATE\FEATURES\ATSNewsletterListEvents\Feature.xml
;***********************************
;*** Begin TemplateFiles section ***
;***********************************
.Set DestinationDir=IMAGES\ATSDeploymentSolution
RootFiles\TEMPLATE\IMAGES\ATSDeploymentSolution\AfricanPith32.gif
RootFiles\TEMPLATE\IMAGES\ATSDeploymentSolution\Thumbs.db
.Set DestinationDir="ControlTemplates"
RootFiles\TEMPLATE\ControlTemplates\SimpleList.ascx
RootFiles\TEMPLATE\ControlTemplates\News.ascx
5. Create the web part to load the user control we created.
using System;
using System.Collections.Generic;
using System.ComponentModel;
using System.Text;
using System.Web;
using System.Web.UI;
using System.Web.UI.WebControls;
using System.Web.UI.WebControls.WebParts;
Namespace ATSDeploymentSolution
{
public class ATSHomeNewsWebPart : WebPart
{
News _news = null;
protected override void CreateChildControls()
{
base.CreateChildControls();
_news = (News)Page.LoadControl("~/_controltemplates/News.ascx");
Controls.Add(_news);
}
}
}
6. Create the webpart xml file and put it under the WebParts folder of the ATSDeploymentSolution Feature.
<?xml version="1.0" encoding="utf-8"?>
<!--Created by STSDEV at 8/05/2008 10:56:56 AM-->
<webParts>
<webPart xmlns="http://schemas.microsoft.com/WebPart/v3">
<metaData>
<type name="ATSDeploymentSolution.ATSHomeNewsWebPart, ATSDeploymentSolution, Version=1.0.0.0, Culture=neutral, PublicKeyToken=ca6621b7467269f9" />
<importErrorMessage>Error importing Web Part</importErrorMessage>
</metaData>
<data>
<properties>
<property name="Title" type="string">ATSHomeNewsWebPart</property>
<property name="Description" type="string">A webpart for news on the home page.</property>
<property name="ChromeState" type="chromestate">Normal</property>
<property name="AllowZoneChange" type="bool">True</property>
<property name="AllowHide" type="bool">True</property>
<property name="ExportMode" type="exportmode">All</property>
</properties>
</data>
</webPart>
</webParts>
7. Add ATSHomeNewsWebPart.webpart to the SolutionPackage.ddf file. This is highlighted in blue in the above code.
8. Add ATSHomeNewsWebPart.webpart to the Feature.xml of the ATSDeploymentSolution Feature. Highlighted in red.
<?xml version="1.0" encoding="utf-8"?>
<!--Created by STSDEV at 8/05/2008 11:12:24 AM-->
<Feature
Id="E152D451-1D60-4457-A3CE-C9FF4B110092"
Title="ATS Web Parts Feature"
Description="This SharePoint solution was created by the Sam Fu."
Version="1.0.0.0"
Scope="Site"
Hidden="false"
ImageUrl="ATSTestSolution\AfricanPith32.gif" xmlns="http://schemas.microsoft.com/sharepoint/">
<ElementManifests>
<ElementManifest
Location="WebParts.xml" />
<ElementFile
Location="WebParts\ATSCompanySearchWebPart.webpart" />
<ElementFile
Location="WebParts\ATSGlobalSearchWebPart.webpart" />
<ElementFile
Location="WebParts\ATSNewsSearchWebPart.webpart" />
<ElementFile
Location="WebParts\ATSNewsletterSearchWebPart.webpart" />
<ElementFile
Location="WebParts\ATSEventSearchWebPart.webpart" />
<ElementFile
Location="WebParts\ATSHidePageWebPart.webpart" />
<ElementFile
Location="WebParts\ATSHomeNewsWebPart.webpart" />
</ElementManifests>
</Feature>
9. Add ATSHomeNewsWebPart.webpart to the WebParts.xml which is the ElementManifest of the ATSDeploymentSolution Feature. Highlighted in red.
<?xml version="1.0" encoding="utf-8"?>
<!--Created by STSDEV at 8/05/2008 10:56:56 AM-->
<Elements xmlns="http://schemas.microsoft.com/sharepoint/">
<Module Name="ATSDeploymentSolution" List="113" Url="_catalogs/wp" Path="WebParts" RootWebOnly="True">
<File Url="ATSCompanySearchWebPart.webpart" Type="GhostableInLibrary">
<Property Name="Group" Value="ATSDeploymentSolution" />
</File>
<File Url="ATSGlobalSearchWebPart.webpart" Type="GhostableInLibrary">
<Property Name="Group" Value="ATSDeploymentSolution" />
</File>
<File Url="ATSNewsSearchWebPart.webpart" Type="GhostableInLibrary">
<Property Name="Group" Value="ATSDeploymentSolution" />
</File>
<File Url="ATSNewsletterSearchWebPart.webpart" Type="GhostableInLibrary">
<Property Name="Group" Value="ATSDeploymentSolution" />
</File>
<File Url="ATSEventSearchWebPart.webpart" Type="GhostableInLibrary">
<Property Name="Group" Value="ATSDeploymentSolution" />
</File>
<File Url="ATSHidePageWebPart.webpart" Type="GhostableInLibrary">
<Property Name="Group" Value="ATSDeploymentSolution" />
</File>
<File Url="ATSHomeNewsWebPart.webpart" Type="GhostableInLibrary">
<Property Name="Group" Value="ATSDeploymentSolution" />
</File>
</Module>
</Elements>
10. Since I have deployed the solution before, I will choose DebugReploy from the Visual studio and build the solution. If you have deployed this web part before, you need to choose DebugUpgrade and build.
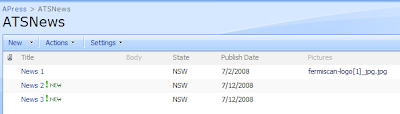
11. Add the web part to the page you want. This is the News List I had:

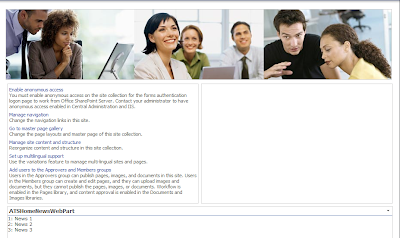
Here is the result:

Using user control in web parts
- As you can see from the above example, using user control in web parts works just fine.
- All you have to do is in CreateChildControls, load the user control and add it to the control tree.
- And In OnPreRender, you can set public properties of the user control just like any other control.
- Pros of using user control in web parts
- Re-use user controls from other application
- Easier for development than web parts
- Cons
- You now have a dependency between the news.ascx file and the solution assembly. If news.ascx is used in lots of different web parts, you may have a versioning issue.
- You can also use SmartPart for loading user control in MOSS. It allows you to choose which user control to load at run time in the browser. Of course, you could extend the above example to do the same thing as well.
Subscribe to:
Posts (Atom)
